Limited Resources. So many Creations.


Contact Me Here: andreablakew@yahoo.com
Showing posts with label bun. Show all posts

Saturday, August 11, 2012

Laced Bows

1. Part the hair diagonally down behind the ear. In front have a side parting.


2. From your parting you took, take a one inch parting at the top of the head back. Bobby pin to the side.


3. With the section you created in step one, begin french braiding. Taking hair from the top corner of the head going vertically down. When you get to above the ear, stop adding in hair and continue regularly braiding. Tie in a rubber band and Bobby pin in the back of the head
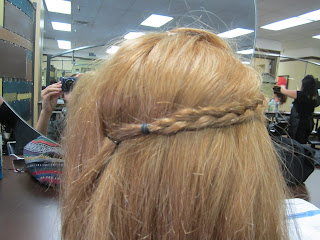


4. Take the hair that you bobby pinned off in step 2 and take a section of it. About an inch thick


Grab a hair pin and open it up like so.


5. With the hair pin, shove the end into a piece of the braid towards the front of the head. With the section you just created in step 4, make it into a loop and start pulling through the hair pin. BUT NOT ALL OF IT!!


6. Pull through until you can get the loop around your finger.


7. Holding onto the loop, with your other hand grab ahold of the hair pin and start pulling the hair through the braid. Slowly work your way through until you see a bow that your satisfied with:)


Continue doing this with 2 more sections. moving your way down the braid each time.


8. Make a bun with the hair.


All Done!!


Knaughty Bun

 Sorry about the wait! But here it is:)

1. Brush everything back into a pony. Do NOT tie back, just keep hold of it with your hand. Start out by taking a triangle section . From the top of the hair line {about an inch width} moving up into a triange shape. Drop out. Continue this around the head, One Inch away from each parting.


2. After doing this all around the head, tie the remaining hair in your hand into a pony, making sure to leave the last of the hair in the pony. Like so.


3. Grab a piece of the hair that you had pulled out in step 1. Begin by grabbing/ wrapping it around with your index and middle finger. Palm facing up towards you. Holding onto the hair, move your wrist so it is facing away from you {while doing this, do NOT move the other hand that is holding the end of the hair strand. keep it in place}. 
Take the end of the hair and have the pinkie finger hold it. 
Turn your wrist back towards you {keep ahold of the hair}
Let go of the hair in the pinkie ONLY. 
Grab with other hand and put inside and pull through the hair that the index and middle finger are holding. Creating the knot.


4. Holding onto the end of the hair strand, pull on the top of the knot you have created to maneuver it where your wanting it to go, pulling the top of the knot towards you inch by inch and pulling the end of the hair strand to keep it in. When finished, bobby pin. Do this all around the head.


When finished,take the hair out of the pony and brush all the remaining hair up into the pony. Tie off.


5. Creating the Bun: there will be 4 seperate sections in the pony. Start with Section one by taking out 1/4th of the hair. {teasing is optional}. 
Section 1

6. Start rolling from the tips of the hair, all the way down to the head. Bobby pin to the scalp to hold in place. Fan the hair out.


Tip: so there are no holes showing in between your sections, bobby pin sections together. making sure the bobby in isnt showing.


Finally Finished:)


Sunday, August 5, 2012

Jean Jacket

So about the jacket.. My boyfriends Mother gave it to me:) She has a sence of fashion for sure!! She gives me all her clothes she saved from when she was my age! I love them all<3 When she first gave me the jacket I honestly didn't know if I wanted it or not. When i put it on the sleeves looked a little funky like. Fanned out :/ .. So i simply rolled them up!! And the jacket looked soooo much better!:)) I decided to wear it out last night. Basing my outfit on that, I wore the cutest silver shorts that I borrowed from Tori. My shoes I bought in California from Buffalo Exchange, and my handy dandy brown braceley watch I got at Nordstrom!! (I need a new one, its breaking D: ) . I was a little sceptical about this outfit, but as the night went on I loved it more and more! To tie it all together i wore my hair and a cute little Princess Bun!! Concidering how short my hair is, it still looked amazing if I do say so myself (; Ohh, sorry about the messy room.. Val!


Friday, July 27, 2012

BowBun with a FunTwist

Step-by-Step on how to create this cute upside down french braid:


1. Take out front hair, make sure to leave it out till the very end.


2. Use your fingers to divide the piece into three equal sections {its much easier to braid with this hairstyle if your hair is upside down} , begin braiding by crossing the strand in your right hand over the strand in the middle. The right strand should now be the middle strand. Then, cross the left strand over the middle strand. The middle strand should now be the left strand. Use your right index finger to part your hair horizontally from your hairline back to the center of your head to form a new right strand. Incorporate this section into the original right section and cross the entire right section over the middle section. While holding the hair that you’ve just braided, use your left index finger to horizontally separate the same section of hair. Incorporate it into the original left section. Cross the left section over the middle section. Repeat the steps.


3. When getting to the top of the head and you run out of hair {remembering to keep the front hair out} put the hair in a pony, making sure to leave a tail out towards the end.


4. Fan out the bun, like so.


 5. Split the hair into two different sections, starting out the bow.


6. With the tail you left out in step 3, grab and bring to the middle of the two split sections. Wrap around pony if needed, bobby pin.{make sure bobby pin isnt showing(; }


7. To finish making the bow, with either a finger or a rat tail comb, make a hole for the front hair that you left out in step 1, to slip through.


8. When finished slipping the front hair through, bring the hair over the previous hair we started with in step 6. After doing so, wrap the remaining hair around the pony. Bobby pin.


Finished Product:


Tips: to make the bow look more like a bow, bobby pin in place at the scalp. Spray.